KevinFan's BLOG

I love freedom for no reason


  • Home

  • Archives

  • Tags

effetive-ruby-tldr-part2

Posted on 2016-05-18

#11. Create namespace by nesting code in Module

  • Use modules to create namespece by nesting definiton inside them.
  • Mirror you namesapece structure to your dir structure.
  • Use :: to fully qualify a top-level constant.

#12. Understand the Different Flavors of Equality

  • Use == to test if two obejcts represent the same value.
1
1 == `1.0` # true
  • Use eql? to test if two objects represent the same value and also the same
    type.
1
2
1 == `1.0` # false
1 == 1 # true
  • Use equal? to test if two objects are the same object (with same object_id),
    so never override this method.

  • === - == || =~ || is_a?

1
2
3
'a'==='a' #true -  'a'=='a'
/a/i==='Abc' #0 - /a/i =~ 'Abc'
String==='a' #true - 'a'.is_a? String

#13. Implement Comparison via <=> and the Comparable Module

  • Implement object ordering by defining a “<=>” operator and including the Comparable module.
  • The “<=>” operator should return nil if the left operand can’t be compared with the right.
  • If you implement “<=>” for a class you should consider aliasing eql? to “==”, especially if you want instances to be usable as hash keys. In which case you should also override the hash method. NOTE. == does NOT test type equity.

#14. Share Private State Through Protected Methods

  • Protected methods can be called with an explicit receiver from objects of the same class

#15. Prefer Class Instance Variables to Class Variables

#16. Duplicate Collections Passed as Arguments Before Mutating Them

  • Method arguments in Ruby are passed as references, not values
  • The dup and clone methods only create shallow copies.
1
2
3
4
5
6
7
8
9
10
11
12
13
14
15
16
17
class User
attr_accessor :name

def initialize(name)
@name = name
end
end

u1 = User.new 'kevin'
u2 = Use.new 'others'

arr = [u1, u2]
arr2 = arr.dup

u2.name = 'new name'

arr == arr2 # true
  • For most objects, Marshal can be used to create deep copies when needed.
1
2
3
4
5
arr3 = Marshal.load Marshal.dump arr

u2.name = 'new new'

arr == arr3 #false

#17. Use the Array Method to Convert nil and Scalar Objects into Arrays

1
2
3
4
5
Array(nil)  # []
Array([nil, :a]) # [nil, :a]
Array({a:12,b:323} #[:a, :b]

# Array() - First tries to call Array#to_ary on arg, then Array#to_a.

#18. Consider Set for Efficient Element Inclusion Checking

  • require 'set' before you use it.

#19. Know How to Fold Collections with reduce

  • Always use a starting value for the accumulator.
1
[1,2,3].reduce(0,:+)  #6
  • The block given to reduce should always return an accumulator. It’s fine to mutate the current accumulator, just remember to return it from the block”.
1
2
3
4
[1,2,3].reduce({}) do |map, e|
map[e.to_s] = e
map
end

#20. Consider Using a Default Hash Value

#21. Prefer Delegation to Inheriting from Collection Classes

Effetive Ruby TLDR - part1

Posted on 2016-05-12

“Accustoming Yourself to Ruby”

#1. Understand What Ruby Considers To Be True

  • Every value is trueexpect false and nil.
  • The number 0 is ture in Ruby.
  • Check if a value is nil with value#nil?.

#2. Treat All Objects As If They Could Be nil

  • Only nil.nil? returns true.
  • You can cast a nil to a empty string with nil.to_s or to a int with
    nil.to_i.

#3. Avoid Ruby’s Cryptic Perlisms

  • Prefer String#match to str =~.
  • Don’t modify global variables unless you must do.

#4. Be Aware That Constants Are Mutable

  • Always freeze constant values to prevent them to be mutated.
  • To prevent assigning new values to existing constants, freeze the module they
    are defined in.

#5. Pay attention to runtime warnings

  • Use the -w CLI option to enable compile and runtime warnings. Or make it
    part of the RUBYOPT env variable.

Classes, Objects and Modules

#6. Know how ruby build inheritance hierarchies

  • Method lookup algo - move right, then go up, that means when you clll a method
    foo.bar, you move to the right, find the class of the object foo, if you
    find bar in foo‘s class, then invoke it, or move to foo‘s superclass, do
    the same thing.
  • If no method has been found, method_missing will be called with the same
    algo as above.
  • Module are classes too. Including modules silently creates singleton classes
    which are inserted into the hierarchy above the including class.
  • Class methods are just instance methods of the class’s metaclass

#7. Be Aware of the Different Behaviors of super

  • Use super to call the overridden method.
  • Use super with no args and no parentheses is equivalent to passing it all of
    the arguments which were given to the enclosing method.
  • Use to super() to call overriden method withoug passing any arguments.

#8. Invoke super When Initializing Sub-classes

  • Ruby doesn’t automatically call the initialize method in the superclass when
    creating objects from a subclass
  • Call the overriden initialize method explicitly with super

#9. Be Alert for Ruby’s Most Vexing Parse

  • Setter method must have a reciever, inside the class that defines it, the
    receiver should be self
  • Avoid using self when call other methods inside a class.

#10. Prefer Struct to Hash for Structured Data

  • When dealing with structured data which doesn’t quite justify a new class
    prefer using Struct to Hash.
  • Assign the return value of Struct::new to a constant and treat that constant
    like a class.

Demo

1
2
3
4
User = Struct.new(:name, :age) # User.class = Class
user = User.new('kevin', 18)
puts user.name
user.age = 22

Hexo + Github Pages = 你的博客

Posted on 2016-04-13

曾经的故事

最近又想搞搞博客了,之前使用过 Hexo,印象不错,但是唯一有一个问题就是我当时是使用hexo d来把hexo g生成的public目录下的内容放到github 上的,后来因为换电脑等等原因,源文件已经找不到了。

有时候也很笨

因此,觉得这个东西不好用,hexo d只是部署生成的表态文件到 github,而不会把源文件也放到 github,这样如果我换电脑或者使用其它电脑时就很不方便,我还得再建一个 repo 去维护这个东西,所以决定尝试一下jekyll

为什么放弃jekyll

首先我得说下我对静态博客工具的态度:

  • 不要很难上手,因为我不想在这上面花太多功夫
  • 可以与github pages集成
  • 支持主题,并且主题要很容易切换 (虽然博客的重点是内容而非表面,但是人都有爱美之心,并且容易喜新厌旧)

我想jekyll与 github pages 是天然集成的,并且它还有无数非常美丽的主题,但是,它的主题切换就不像hexo那么的方便了,当然有可能是我没有搞清楚,但是, anyway,我不想在这上面花太多功夫,所以,决定回归hexo.

如何重回 hexo

versoin control你的源代码

对于上面我说的hexo的源代码如何保存的问题,我现在的做法是这样的
建立一个新的分支blog/hexo, 这里面就放着从hexo init到后面各种修改的内容,但是下面这几个文件我觉得是没有必要提交的,所以,可以把它们加到.gitignore文件中

1
.deploy_git/
node_modules/
public/
themes/
db.json

这里特别要注意的是themes,因为这下面放了你下载的主题,你是很有可能对这些主题进行自定义配置的,所以我的想法是创建一个相对应主题的配置文件,然后把themes/bla-theme/bla.file 链接到你新建的配置文件。(当然了,我还没来得及弄)

部署你的网站

hexo提供了hexo-deployer-git可以让你只用一句命令hexo d就可以将你的网站部署到 github pages 上, 具体请看官方文档

在使用这个工具之前,你需要确保

  1. 你已经配置了你的 git repo 信息到_config.yml中,示例如下:

    1
    deploy:
      type: git
      repo: git@github.com:kevinjom/kevinjom.github.io.git
      branch: master
  2. 先执行hexo g

当然了,如果嫌麻烦,你可以写一个简单的脚本。下面是一个例子

1
2
3
4
5
6
7
8
9
10
11
12
13
14
15
16
17
18
19
20
21
#!/bin/bash

set -e

PROG=$(basename $0)

usage() {
echo "$PROG <commit message>"
exit 1
}

[[ -n $1 ]] || usage

git stash
git pull origin blog/hexo --rebase
git stash pop || echo "no stash to pop"
git add .
git commit -m "$1"

hexo g
hexo d

自定义域名过期了怎么办

如果曾经配置过CNAME,但是域名过期了,又没有新域名使用,你想使用bla.github.io来访问,但你会发现 github还是会跳转至你曾经的域名,解决办法是将 CNAME的内容更新为bla.github.io

Spring AOP 实现原理

Posted on 2013-09-24

什么是AOP

AOP(Aspect-OrientedProgramming,面向方面编程),可以说是OOP(Object-Oriented Programing,面向对象编程)的补充和完善。OOP引入封装、继承和多态性等概念来建立一种对象层次结构,用以模拟公共行为的一个集合。当我们需要为分散的对象引入公共行为的时候,OOP则显得无能为力。也就是说,OOP允许你定义从上到下的关系,但并不适合定义从左到右的关系。例如日志功能。日志代码往往水平地散布在所有对象层次中,而与它所散布到的对象的核心功能毫无关系。对于其他类型的代码,如安全性、异常处理和透明的持续性也是如此。这种散布在各处的无关的代码被称为横切(cross-cutting)代码,在OOP设计中,它导致了大量代码的重复,而不利于各个模块的重用。

而AOP技术则恰恰相反,它利用一种称为“横切”的技术,剖解开封装的对象内部,并将那些影响了多个类的公共行为封装到一个可重用模块,并将其名为“Aspect”,即方面。所谓“方面”,简单地说,就是将那些与业务无关,却为业务模块所共同调用的逻辑或责任封装起来,便于减少系统的重复代码,降低模块间的耦合度,并有利于未来的可操作性和可维护性。AOP代表的是一个横向的关系,如果说“对象”是一个空心的圆柱体,其中封装的是对象的属性和行为;那么面向方面编程的方法,就仿佛一把利刃,将这些空心圆柱体剖开,以获得其内部的消息。而剖开的切面,也就是所谓的“方面”了。然后它又以巧夺天功的妙手将这些剖开的切面复原,不留痕迹。

使用“横切”技术,AOP把软件系统分为两个部分:核心关注点和横切关注点。业务处理的主要流程是核心关注点,与之关系不大的部分是横切关注点。横切关注点的一个特点是,他们经常发生在核心关注点的多处,而各处都基本相似。比如权限认证、日志、事务处理。Aop 的作用在于分离系统中的各种关注点,将核心关注点和横切关注点分离开来。正如Avanade公司的高级方案构架师Adam Magee所说,AOP的核心思想就是“将应用程序中的商业逻辑同对其提供支持的通用服务进行分离。”

实现AOP的技术,主要分为两大类:一是采用动态代理技术,利用截取消息的方式,对该消息进行装饰,以取代原有对象行为的执行;二是采用静态织入的方式,引入特定的语法创建“方面”,从而使得编译器可以在编译期间织入有关“方面”的代码。

AOP使用场景

AOP用来封装横切关注点,具体可以在下面的场景中使用:

  • Authentication 权限
  • Caching 缓存
  • Context passing 内容传递
  • Error handling 错误处理
  • Lazy loading 懒加载
  • Debugging  调试
  • logging, tracing, profiling and monitoring 记录跟踪 优化 校准
  • Performance optimization 性能优化
  • Persistence  持久化
  • Resource pooling 资源池
  • Synchronization 同步
  • Transactions 事务

AOP相关概念

  • 方面(Aspect):一个关注点的模块化,这个关注点实现可能另外横切多个对象。事务管理是J2EE应用中一个很好的横切关注点例子。方面用Spring的 Advisor或拦截器实现。
  • 连接点(Joinpoint): 程序执行过程中明确的点,如方法的调用或特定的异常被抛出。
  • 通知(Advice): 在特定的连接点,AOP框架执行的动作。各种类型的通知包括“around”、“before”和“throws”通知。通知类型将在下面讨论。许多AOP框架包括Spring都是以拦截器做通知模型,维护一个“围绕”连接点的拦截器链。Spring中定义了四个advice: BeforeAdvice, AfterAdvice, ThrowAdvice和DynamicIntroductionAdvice
  • 切入点(Pointcut): 指定一个通知将被引发的一系列连接点的集合。AOP框架必须允许开发者指定切入点:例如,使用正则表达式。 Spring定义了Pointcut接口,用来组合MethodMatcher和ClassFilter,可以通过名字很清楚的理解, MethodMatcher是用来检查目标类的方法是否可以被应用此通知,而ClassFilter是用来检查Pointcut是否应该应用到目标类上
  • 引入(Introduction): 添加方法或字段到被通知的类。 Spring允许引入新的接口到任何被通知的对象。例如,你可以使用一个引入使任何对象实现 IsModified接口,来简化缓存。Spring中要使用Introduction, 可有通过DelegatingIntroductionInterceptor来实现通知,通过DefaultIntroductionAdvisor来配置Advice和代理类要实现的接口
  • 目标对象(Target Object): 包含连接点的对象。也被称作被通知或被代理对象。POJO
  • AOP代理(AOP Proxy): AOP框架创建的对象,包含通知。 在Spring中,AOP代理可以是JDK动态代理或者CGLIB代理。
  • 织入(Weaving): 组装方面来创建一个被通知对象。这可以在编译时完成(例如使用AspectJ编译器),也可以在运行时完成。Spring和其他纯Java AOP框架一样,在运行时完成织入。

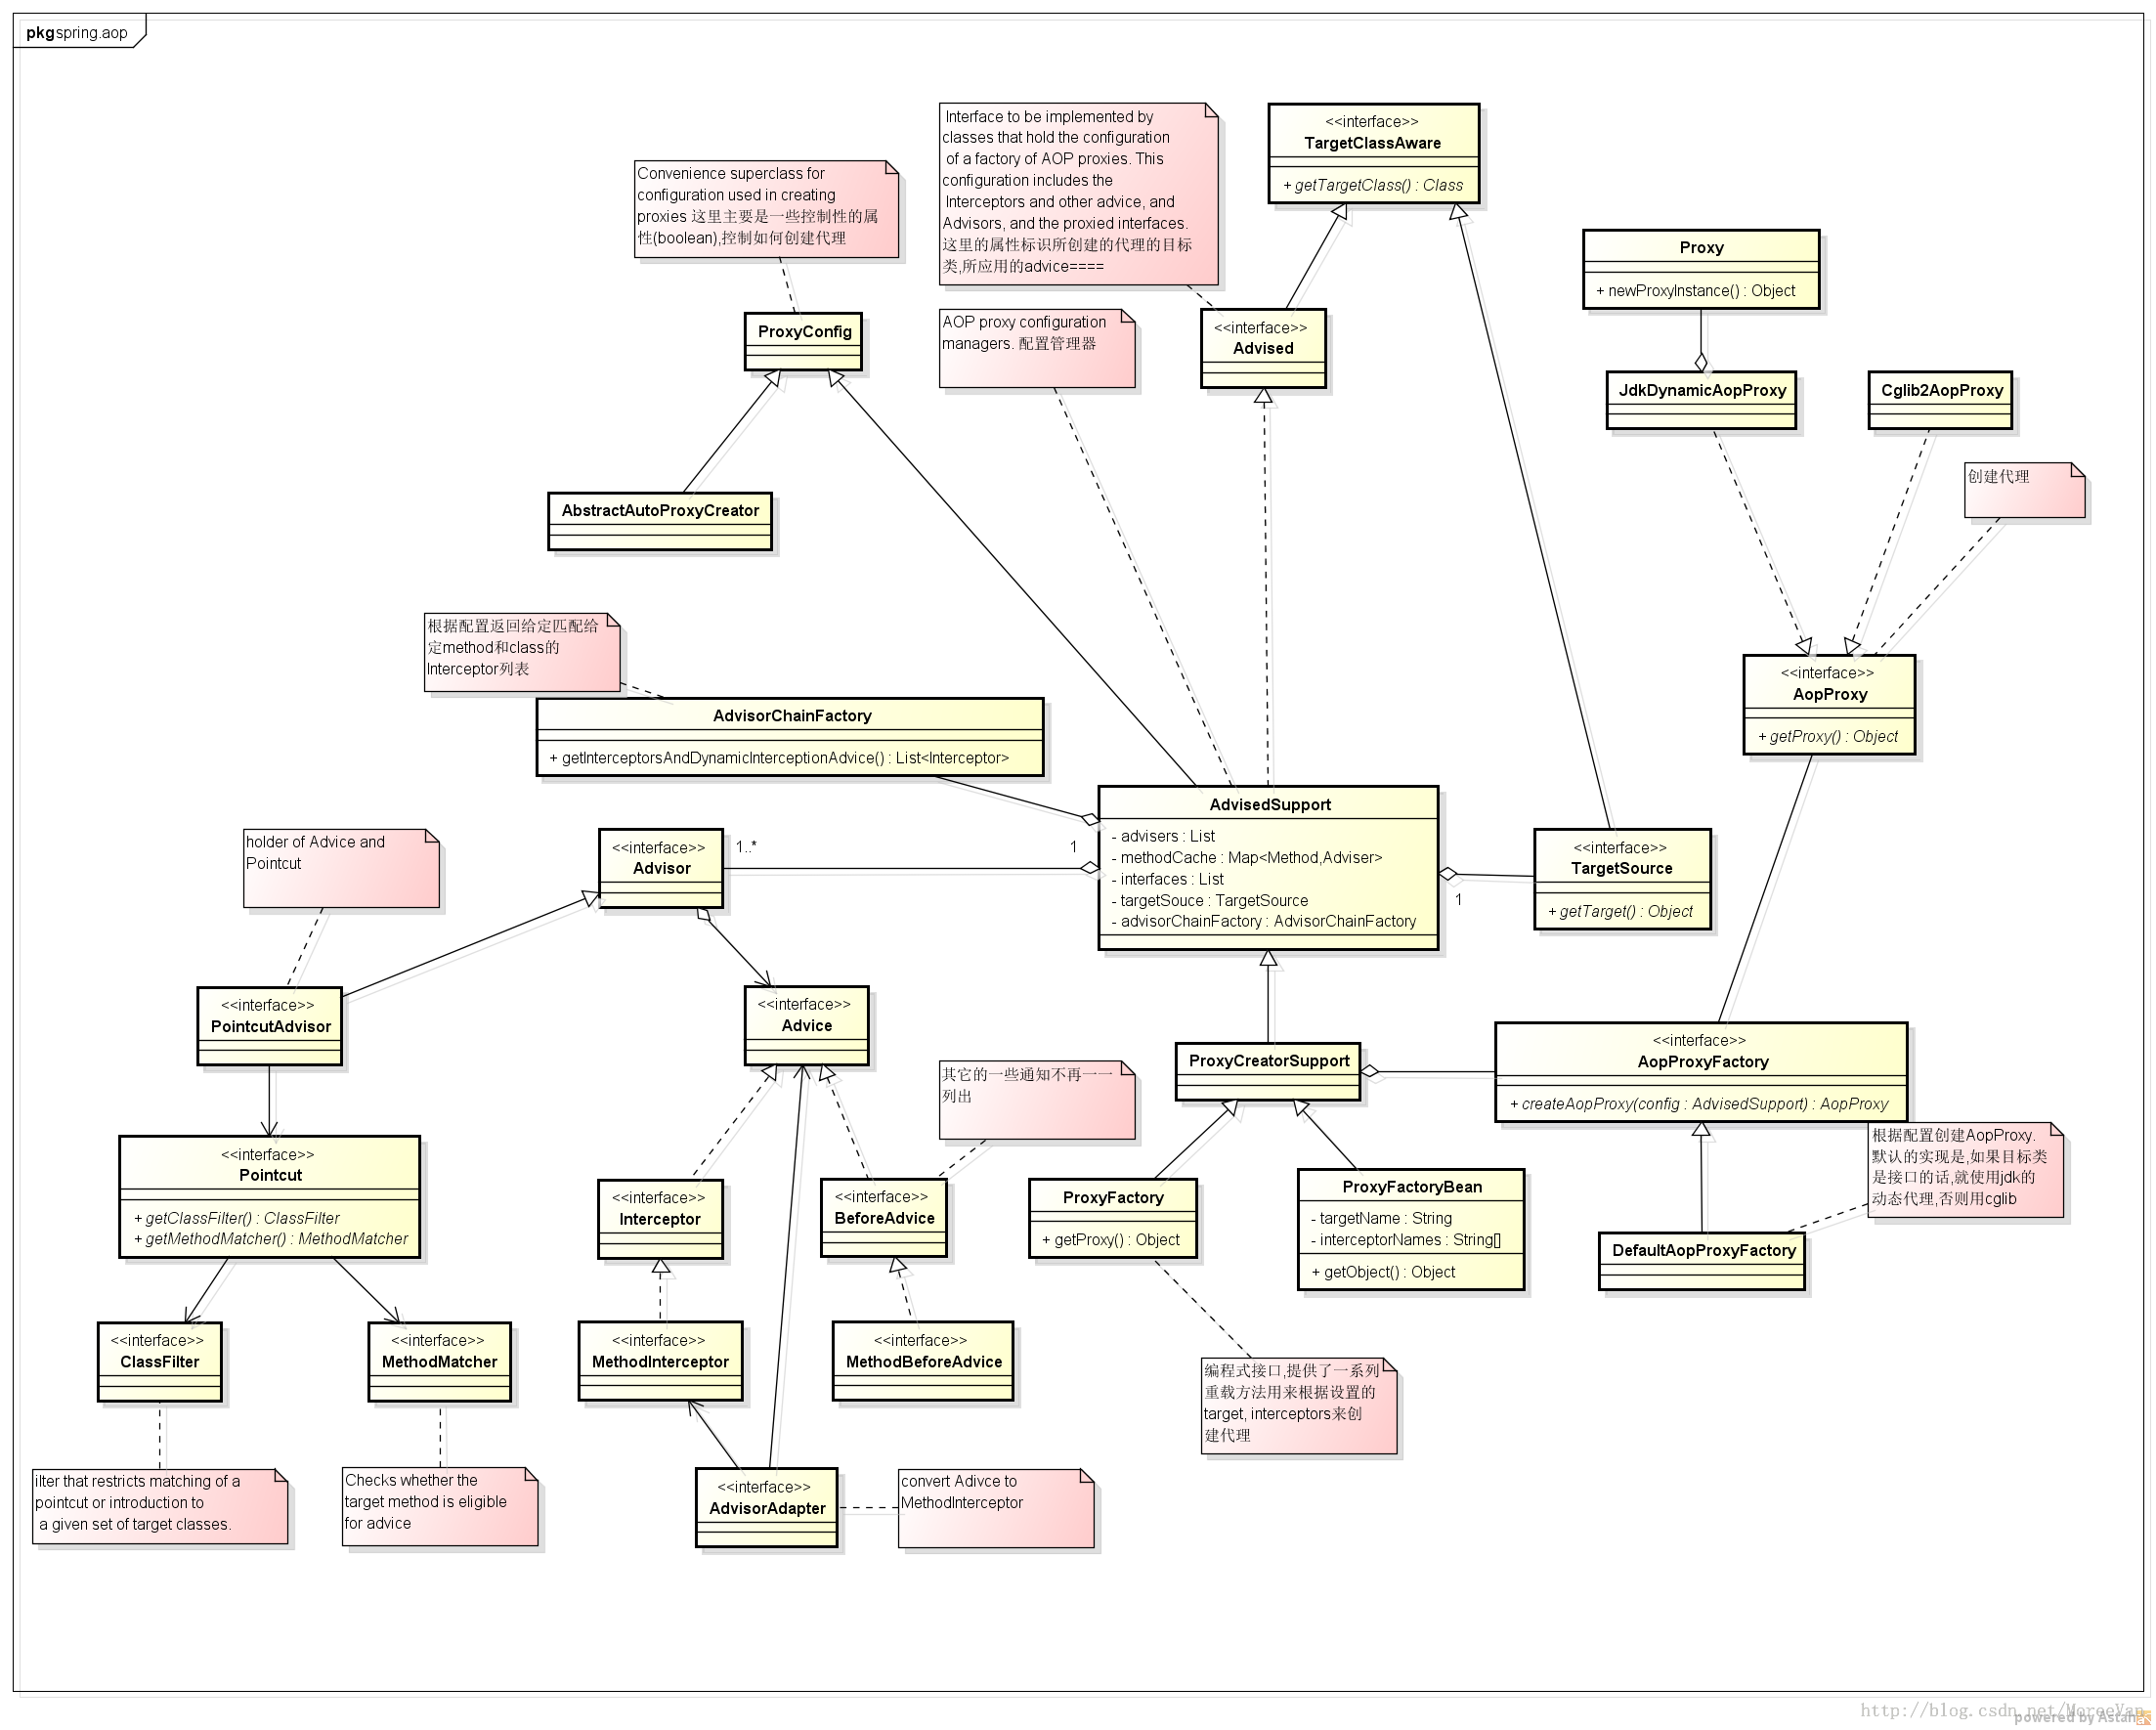
Spring AOP组件

下面这种类图列出了Spring中主要的AOP组件

如何使用Spring AOP

可以通过配置文件或者编程的方式来使用Spring AOP。

配置可以通过xml文件来进行,大概有四种方式:

  1. 配置ProxyFactoryBean,显式地设置advisors, advice, target等
  2. 配置AutoProxyCreator,这种方式下,还是如以前一样使用定义的bean,但是从容器中获得的其实已经是代理对象
  3. 通过来配置
  4. 通过来配置,使用AspectJ的注解来标识通知及切入点

也可以直接使用ProxyFactory来以编程的方式使用Spring AOP,通过ProxyFactory提供的方法可以设置target对象, advisor等相关配置,最终通过 getProxy()方法来获取代理对象

具体使用的示例可以google. 这里略去

Spring AOP代理对象的生成

Spring提供了两种方式来生成代理对象: JDKProxy和Cglib,具体使用哪种方式生成由AopProxyFactory根据AdvisedSupport对象的配置来决定。默认的策略是如果目标类是接口,则使用JDK动态代理技术,否则使用Cglib来生成代理。下面我们来研究一下Spring如何使用JDK来生成代理对象,具体的生成代码放在JdkDynamicAopProxy这个类中,直接上相关代码:

1
2
3
4
5
6
7
8
9
10
11
12
13
14
15
/**
* <ol>
* <li>获取代理类要实现的接口,除了Advised对象中配置的,还会加上SpringProxy, Advised(opaque=false)
* <li>检查上面得到的接口中有没有定义 equals或者hashcode的接口
* <li>调用Proxy.newProxyInstance创建代理对象
* </ol>
*/

public Object getProxy(ClassLoader classLoader) {
if (logger.isDebugEnabled()) {
logger.debug("Creating JDK dynamic proxy: target source is " +this.advised.getTargetSource());
}
Class[] proxiedInterfaces =AopProxyUtils.completeProxiedInterfaces(this.advised);
findDefinedEqualsAndHashCodeMethods(proxiedInterfaces);
return Proxy.newProxyInstance(classLoader, proxiedInterfaces, this);
}

那这个其实很明了,注释上我也已经写清楚了,不再赘述。

下面的问题是,代理对象生成了,那切面是如何织入的?
我们知道InvocationHandler是JDK动态代理的核心,生成的代理对象的方法调用都会委托到InvocationHandler.invoke()方法。而通过JdkDynamicAopProxy的签名我们可以看到这个类其实也实现了InvocationHandler,下面我们就通过分析这个类中实现的invoke()方法来具体看下Spring AOP是如何织入切面的。

1
2
3
4
5
6
7
8
9
10
11
12
13
14
15
16
17
18
19
20
21
22
23
24
25
26
27
28
29
30
31
32
33
34
35
36
37
38
39
40
41
42
43
44
45
46
47
48
49
50
51
52
53
54
55
56
57
58
59
60
61
62
63
64
65
66
67
68
69
70
71
72
73
publicObject invoke(Object proxy, Method method, Object[] args) throwsThrowable {
MethodInvocation invocation = null;
Object oldProxy = null;
boolean setProxyContext = false;

TargetSource targetSource = this.advised.targetSource;
Class targetClass = null;
Object target = null;

try {
//eqauls()方法,具目标对象未实现此方法
if (!this.equalsDefined && AopUtils.isEqualsMethod(method)){
return (equals(args[0])? Boolean.TRUE : Boolean.FALSE);
}

//hashCode()方法,具目标对象未实现此方法
if (!this.hashCodeDefined && AopUtils.isHashCodeMethod(method)){
return newInteger(hashCode());
}

//Advised接口或者其父接口中定义的方法,直接反射调用,不应用通知
if (!this.advised.opaque &&method.getDeclaringClass().isInterface()
&&method.getDeclaringClass().isAssignableFrom(Advised.class)) {
// Service invocations onProxyConfig with the proxy config...
return AopUtils.invokeJoinpointUsingReflection(this.advised,method, args);
}

Object retVal = null;

if (this.advised.exposeProxy) {
// Make invocation available ifnecessary.
oldProxy = AopContext.setCurrentProxy(proxy);
setProxyContext = true;
}

//获得目标对象的类
target = targetSource.getTarget();
if (target != null) {
targetClass = target.getClass();
}

//获取可以应用到此方法上的Interceptor列表
List chain = this.advised.getInterceptorsAndDynamicInterceptionAdvice(method,targetClass);

//如果没有可以应用到此方法的通知(Interceptor),此直接反射调用 method.invoke(target, args)
if (chain.isEmpty()) {
retVal = AopUtils.invokeJoinpointUsingReflection(target,method, args);
} else {
//创建MethodInvocation
invocation = newReflectiveMethodInvocation(proxy, target, method, args, targetClass, chain);
retVal = invocation.proceed();
}

// Massage return value if necessary.
if (retVal != null && retVal == target &&method.getReturnType().isInstance(proxy)
&&!RawTargetAccess.class.isAssignableFrom(method.getDeclaringClass())) {
// Special case: it returned"this" and the return type of the method
// is type-compatible. Notethat we can't help if the target sets
// a reference to itself inanother returned object.
retVal = proxy;
}
return retVal;
} finally {
if (target != null && !targetSource.isStatic()) {
// Must have come fromTargetSource.
targetSource.releaseTarget(target);
}
if (setProxyContext) {
// Restore old proxy.
AopContext.setCurrentProxy(oldProxy);
}
}
}

主流程可以简述为:获取可以应用到此方法上的通知链(Interceptor Chain),如果有,则应用通知,并执行joinpoint; 如果没有,则直接反射执行joinpoint。而这里的关键是通知链是如何获取的以及它又是如何执行的,下面逐一分析下。

首先,从上面的代码可以看到,通知链是通过Advised.getInterceptorsAndDynamicInterceptionAdvice()这个方法来获取的,我们来看下这个方法的实现:

1
2
3
4
5
6
7
8
9
10
public List<Object>getInterceptorsAndDynamicInterceptionAdvice(Method method, Class targetClass) {
MethodCacheKeycacheKey = new MethodCacheKey(method);
List<Object>cached = this.methodCache.get(cacheKey);
if(cached == null) {
cached= this.advisorChainFactory.getInterceptorsAndDynamicInterceptionAdvice(
this,method, targetClass);
this.methodCache.put(cacheKey,cached);
}
returncached;
}

可以看到实际的获取工作其实是由AdvisorChainFactory. getInterceptorsAndDynamicInterceptionAdvice()这个方法来完成的,获取到的结果会被缓存。
下面来分析下这个方法的实现:

1
2
3
4
5
6
7
8
9
10
11
12
13
14
15
16
17
18
19
20
21
22
23
24
25
26
27
28
29
30
31
32
33
34
35
36
37
38
39
40
41
42
43
44
45
46
47
48
49
50
51
52
53
54
55
/**
* 从提供的配置实例config中获取advisor列表,遍历处理这些advisor.如果是IntroductionAdvisor,
* 则判断此Advisor能否应用到目标类targetClass上.如果是PointcutAdvisor,则判断
* 此Advisor能否应用到目标方法method上.将满足条件的Advisor通过AdvisorAdaptor转化成Interceptor列表返回.
*/

publicList getInterceptorsAndDynamicInterceptionAdvice(Advised config, Methodmethod, Class targetClass) {
// This is somewhat tricky... we have to process introductions first,
// but we need to preserve order in the ultimate list.
List interceptorList = new ArrayList(config.getAdvisors().length);

//查看是否包含IntroductionAdvisor
boolean hasIntroductions = hasMatchingIntroductions(config,targetClass);

//这里实际上注册一系列AdvisorAdapter,用于将Advisor转化成MethodInterceptor
AdvisorAdapterRegistry registry = GlobalAdvisorAdapterRegistry.getInstance();

Advisor[] advisors = config.getAdvisors();
for (int i = 0; i <advisors.length; i++) {
Advisor advisor = advisors[i];
if (advisor instanceof PointcutAdvisor) {
// Add it conditionally.
PointcutAdvisor pointcutAdvisor= (PointcutAdvisor) advisor;
if(config.isPreFiltered() ||pointcutAdvisor.getPointcut().getClassFilter().matches(targetClass)) {
//TODO: 这个地方这两个方法的位置可以互换下
//将Advisor转化成Interceptor
MethodInterceptor[]interceptors = registry.getInterceptors(advisor);

//检查当前advisor的pointcut是否可以匹配当前方法
MethodMatcher mm =pointcutAdvisor.getPointcut().getMethodMatcher();

if (MethodMatchers.matches(mm,method, targetClass, hasIntroductions)) {
if(mm.isRuntime()) {
// Creating a newobject instance in the getInterceptors() method
// isn't a problemas we normally cache created chains.
for (intj = 0; j < interceptors.length; j++) {
interceptorList.add(new InterceptorAndDynamicMethodMatcher(interceptors[j],mm));
}
} else {
interceptorList.addAll(Arrays.asList(interceptors));
}
}
}
} else if (advisor instanceof IntroductionAdvisor){
IntroductionAdvisor ia =(IntroductionAdvisor) advisor;
if(config.isPreFiltered() || ia.getClassFilter().matches(targetClass)) {
Interceptor[] interceptors= registry.getInterceptors(advisor);
interceptorList.addAll(Arrays.asList(interceptors));
}
} else {
Interceptor[] interceptors =registry.getInterceptors(advisor);
interceptorList.addAll(Arrays.asList(interceptors));
}
}
return interceptorList;
}

这个方法执行完成后,Advised中配置能够应用到连接点或者目标类的Advisor全部被转化成了MethodInterceptor.

接下来我们再看下得到的拦截器链是怎么起作用的。

1
2
3
4
5
6
7
if (chain.isEmpty()) {
retVal = AopUtils.invokeJoinpointUsingReflection(target,method, args);
} else {
//创建MethodInvocation
invocation = newReflectiveMethodInvocation(proxy, target, method, args, targetClass, chain);
retVal = invocation.proceed();
}

从这段代码可以看出,如果得到的拦截器链为空,则直接反射调用目标方法,否则创建MethodInvocation,调用其proceed方法,触发拦截器链的执行,来看下具体代码

1
2
3
4
5
6
7
8
9
10
11
12
13
14
15
16
17
18
19
20
21
22
23
24
25
26
27
28
29
30
31
32
33
public Object proceed() throws Throwable {
// We start with an index of -1and increment early.
if (this.currentInterceptorIndex == this.interceptorsAndDynamicMethodMatchers.size()- 1) {
//如果Interceptor执行完了,则执行joinPoint
return invokeJoinpoint();
}

Object interceptorOrInterceptionAdvice =
this.interceptorsAndDynamicMethodMatchers.get(++this.currentInterceptorIndex);

//如果要动态匹配joinPoint
if (interceptorOrInterceptionAdvice instanceof InterceptorAndDynamicMethodMatcher){
// Evaluate dynamic method matcher here: static part will already have
// been evaluated and found to match.
InterceptorAndDynamicMethodMatcher dm =
(InterceptorAndDynamicMethodMatcher)interceptorOrInterceptionAdvice;
//动态匹配:运行时参数是否满足匹配条件
if (dm.methodMatcher.matches(this.method, this.targetClass,this.arguments)) {
//执行当前Intercetpor
returndm.interceptor.invoke(this);
}
else {
//动态匹配失败时,略过当前Intercetpor,调用下一个Interceptor
return proceed();
}
}
else {
// It's an interceptor, so we just invoke it: The pointcutwill have
// been evaluated statically before this object was constructed.
//执行当前Intercetpor
return ((MethodInterceptor) interceptorOrInterceptionAdvice).invoke(this);
}
}

代码也比较简单,这里不再赘述。

jdk动态代理实现原理

Posted on 2013-09-13

写在前面:

  • 大神和diao炸天的亲请绕道..
  • 关于代理模式的概念这里省去,大家可以放鸟尽情搜..
  • 关于为什么叫动态代理,个人理解是代理的类是在运行时动态生成的,大家也可以参考网上的理解..
  • 文笔很差,所以文字较少,都在代码和注释中..

=======一点不华丽的分割线————————-

开门见山,lets go..

java中可以通过jdk提供的 Proxy.newProxyInstance静态方法来创建动态代理对象,下面先来看看这个方法的实现

1
2
3
4
5
6
7
8
9
10
11
12
13
14
15
16
17
18
19
20
21
22
23
24
25
26
27
28
public static Object newProxyInstance(ClassLoader loader, Class<?>[] interfaces, InvocationHandler h)
throws IllegalArgumentException {

//InvocationHandler不能为空,因为对代理对象的所有方法调用实际上都会委托到InvocationHandler的invoke方法,
//这个我们后面通过查看产生的代理类的源代码便会一目了然
if (h == null) {
throw new NullPointerException();
}

//这个是核心的地方,通过提供的ClassLoader和interface列表来产生代理类,具体的实现可以参考getProxyClass这个方法的实现,
//真正的工作是由sun.misc.ProxyGenerator这个类来完成的,可以google查看具体的逻辑.在我们的程序中通过设置
//System.setProperty("sun.misc.ProxyGenerator.saveGeneratedFiles", "true")可以查看产生的类文件
Class cl = getProxyClass(loader, interfaces);

//因为代理类继承了Proxy类.而Proxy中定义了构造函数protected Proxy(InvocationHandler h),所以可以反射得到Constructer实例
//创建代理对象
try {
Constructor cons = cl.getConstructor(constructorParams);
return (Object) cons.newInstance(new Object[] { h });
} catch (NoSuchMethodException e) {
throw new InternalError(e.toString());
} catch (IllegalAccessException e) {
throw new InternalError(e.toString());
} catch (InstantiationException e) {
throw new InternalError(e.toString());
} catch (InvocationTargetException e) {
throw new InternalError(e.toString());
}
}

下面通过个例子来说明下:
先来定义一个接口,jdk的动态代理基于接口来创建代理类,不能基于类的原因是java不支持多重继承,而代理类都会继承Proxy类(个人理解).

1
2
3
4
5
6
7
8
9
10
11
/**
* Subject
*
* @author Kevin Fan
* @since 2013-9-13 下午2:43:33
*/

public interface Subject {
void pub(String key, String content);

String sub(String key);
}

再来一个具体的实现,在代理模式中可以叫它的实例可以叫target,这个是真正执行操作的对象

1
2
3
4
5
6
7
8
9
10
11
12
13
14
15
16
17
18
19
20
21
22
23
24
25
/**
* SimpleSubject
*
* @author Kevin Fan
* @since 2013-9-13 下午2:45:03
*/

public class SimpleSubject implements Subject {
private Map<String, String> msg = new ConcurrentHashMap<String, String>();

public void pub(String key, String content) {
System.out.println("pub msg: key is " + key + ", content is " + content);
msg.put(key, content);
}

public String sub(String key) {
if (msg.containsKey(key)) {
String ret = msg.get(key);
System.out.println("sub msg: key is " + key + ", result is " + ret);
return ret;
}

return null;
}

}

好,接下来我们来写个动态代理工厂,根据 不同的target来创建动态代理对象

1
2
3
4
5
6
7
8
9
10
11
12
13
14
15
16
17
18
19
20
21
/**
* SubjectProxyFactory
*
* @author Kevin Fan
* @since 2013-9-13 下午2:47:24
*/

public class SubjectProxyFactory {
//TODO: cache
public static Subject getSubject(final Subject realSubject) {
return (Subject) Proxy.newProxyInstance(realSubject.getClass().getClassLoader(), new Class[] { Subject.class },
new InvocationHandler() {

public Object invoke(Object proxy, Method method, Object[] args) throws Throwable {
System.out.println("\naction before method invocation....");
Object retVal = method.invoke(realSubject, args);
System.out.println("action after method invocation....\n");
return retVal;
}
});
}
}

可以看到这是一个简单的实现,只是在真实对象执行前后各打一句信息..

接下来用一个 main函数来把这些结合起来

1
2
3
4
5
6
7
8
9
10
11
12
13
14
15
16
17
18
19
20
21
22
/**
* Demo
*
* @author Kevin Fan
* @since 2013-9-13 下午2:50:28
*/

public class Demo {
public static void main(String[] args) {
//设置此系统属性,以查看代理类文件
System.setProperty("sun.misc.ProxyGenerator.saveGeneratedFiles", "true");

//创建真实对象
Subject subj = new SimpleSubject();
subj.pub("name", "kevin.fan");
subj.sub("name");

//创建代理对象
Subject proxy = SubjectProxyFactory.getSubject(subj);
proxy.pub("hobby", "r&b music");
proxy.sub("name");
}
}

ok,小手抖一下,走你,看下执行结果

1
2
3
4
5
6
7
8
9
10
11
12
pub msg: key is name, content is kevin.fan
sub msg: key is name, result is kevin.fan


action before method invocation....
pub msg: key is hobby, content is r&b music
action after method invocation....


action before method invocation....
sub msg: key is name, result is kevin.fan
action after method invocation....

可以看到在调用代理对象的方法时,添加的额外动作已经生效,接下来我们看下生成的代理类的代码..

1
2
3
4
5
6
7
8
9
10
11
12
13
14
15
16
17
18
19
20
21
22
23
24
25
26
27
28
29
30
31
32
33
34
35
36
37
38
39
40
41
42
43
44
45
46
47
48
49
50
51
52
53
54
55
56
57
58
59
60
61
62
63
64
65
66
67
68
69
70
71
72
73
74
75
76
77
78
79
80
81
82
83
84
85
86
87
88
89
90
91
92
93
94
95
96
97
98
99
100
101
102
103
104
105
106
107
108
109
110
111
112
113
114
115
116
117
118
119
120
121
122
123
124
125
126
127
128
129
130
131
132
133
134
135
136
137
import com.aliyun.demo.kevin.coder.lang.proxy.Subject;
import java.lang.reflect.InvocationHandler;
import java.lang.reflect.Method;
import java.lang.reflect.Proxy;
import java.lang.reflect.UndeclaredThrowableException;

//这里很清楚了,代理类继承了Proxy类,并且实现了Proxy.newProxyInstance这个方法中传入的接口

public final class $Proxy0 extends Proxy
implements Subject
{


//这些方法在下面的static init block中进行初始化
private static Method m4;
private static Method m1;
private static Method m3;
private static Method m0;
private static Method m2;

static
{
try
{
m4 = Class.forName("com.aliyun.demo.kevin.coder.lang.proxy.Subject").getMethod("sub", new Class[] { Class.forName("java.lang.String") });
m1 = Class.forName("java.lang.Object").getMethod("equals", new Class[] { Class.forName("java.lang.Object") });
m3 = Class.forName("com.aliyun.demo.kevin.coder.lang.proxy.Subject").getMethod("pub", new Class[] { Class.forName("java.lang.String"), Class.forName("java.lang.String") });
m0 = Class.forName("java.lang.Object").getMethod("hashCode", new Class[0]);
m2 = Class.forName("java.lang.Object").getMethod("toString", new Class[0]);
return;
}
catch (NoSuchMethodException localNoSuchMethodException)
{
throw new NoSuchMethodError(localNoSuchMethodException.getMessage());
}
catch (ClassNotFoundException localClassNotFoundException)
{
throw new NoClassDefFoundError(localClassNotFoundException.getMessage());
}
}

//构造函数,接收一个 InvocationHandler作为参数,这就是为什么Proxy.newProxyInstance方法里可以
//通过InvocationHandler实例作为参数来反射获取Constructer实例
public $Proxy0 paramInvocationHandler)
throws
{
super(paramInvocationHandler);
}

//下面通过这个来看下代理对象中方法是怎样调用的
public final String sub(String paramString)
throws
{

try
{
//全部是通过调用InvocationHandler的invoke方法,传入对应的方法和参数
return (String)this.h.invoke(this, m4, new Object[] { paramString });
}
catch (Error|RuntimeException localError)
{
throw localError;
}
catch (Throwable localThrowable)
{
throw new UndeclaredThrowableException(localThrowable);
}
}

public final boolean equals(Object paramObject)
throws
{

try
{
return ((Boolean)this.h.invoke(this, m1, new Object[] { paramObject })).booleanValue();
}
catch (Error|RuntimeException localError)
{
throw localError;
}
catch (Throwable localThrowable)
{
throw new UndeclaredThrowableException(localThrowable);
}
}

public final void pub(String paramString1, String paramString2)
throws
{

try
{
this.h.invoke(this, m3, new Object[] { paramString1, paramString2 });
return;
}
catch (Error|RuntimeException localError)
{
throw localError;
}
catch (Throwable localThrowable)
{
throw new UndeclaredThrowableException(localThrowable);
}
}

public final int hashCode()
throws
{

try
{
return ((Integer)this.h.invoke(this, m0, null)).intValue();
}
catch (Error|RuntimeException localError)
{
throw localError;
}
catch (Throwable localThrowable)
{
throw new UndeclaredThrowableException(localThrowable);
}
}

public final String toString()
throws
{

try
{
return (String)this.h.invoke(this, m2, null);
}
catch (Error|RuntimeException localError)
{
throw localError;
}
catch (Throwable localThrowable)
{
throw new UndeclaredThrowableException(localThrowable);
}
}

}

Java IO读取速度测试

Posted on 2012-11-29

不知道是什么情况,今天喜欢上了看IO这个东东。。回来码了几行简单的不能再简单的代码 ,跑了一把,得了几个 数据 ,放到这里跟大家分享下。。
先把测试的结果截图摆上来欣赏一下:有一点需要说明的是,前四个方法是以字节流的形式读取一个大小为11M左右的rar文件,后面两个 方法是以字符流的形式读取在小在1M~2M之间的一个文本文件~

具体每个方法是怎么实现 的,代码简单到了什么程度,常用到了什么程度 。。。。。。
话不多说,元芳,代码在这里,你怎么看?

1
2
3
4
5
6
7
8
9
10
11
12
13
14
15
16
17
18
19
20
21
22
23
24
25
26
27
28
29
30
31
32
33
34
35
36
37
38
39
40
41
42
43
44
45
46
47
48
49
50
51
52
53
54
55
56
57
58
59
60
61
62
63
64
65
66
67
68
69
70
71
72
73
74
75
76
77
78
79
80
81
82
83
84
85
86
87
88
89
90
91
92
93
public class IOSpeedTest {
private static final String file = "G:\\pt.rar";

@Test
public void testWithoutBuf() throws IOException {
int line = 0;
FileInputStream in = new FileInputStream(file);
int bit = -1;
while ((bit = in.read()) != -1) {
if (bit == '\n') {
++line;
}
}
if (in != null) {
in.close();
}
System.out.println(line);
}

@Test
public void testWithBufferedIn() throws IOException {
BufferedInputStream in = new BufferedInputStream(new FileInputStream(file));
int line = 0;
int bit = -1;
while ((bit = in.read()) != -1) {
if (bit == '\n') {
++line;
}
}
if (in != null) {
in.close();
}
System.out.println(line);
}

@Test
public void testWithFixedBuf() throws IOException {
int bufSize = 8196;
FileInputStream in = new FileInputStream(file);
int line = 0;
byte[] buf = new byte[bufSize];
while (in.read(buf) != -1) {
for (byte element : buf) {
if (element == '\n') {
++line;
}
}
}
if (in != null) {
in.close();
}
System.out.println(line);
}

@Test
public void testWithWholeFile() throws IOException {
FileInputStream in = new FileInputStream(file);
int line = 0;
byte[] buf = new byte[file.length()];
in.read(buf);
for (byte element : buf) {
if (element == '\n') {
++line;
}
}
if (in != null) {
in.close();
}
System.out.println(line);
}

private static final String txt = "G:\\cy.txt";

@Test
public void testWithBf() throws IOException {
BufferedReader bf = new BufferedReader(new InputStreamReader(new FileInputStream(txt)));
while (bf.readLine() != null) {

}
}

@Test
public void testWithFixedBf() throws IOException {
int bufSize = 8196;
InputStreamReader reader = new InputStreamReader(new FileInputStream(txt));
char[] buf = new char[bufSize];
while (reader.read(buf) != -1) {

}
reader.close();
}

}

好长时间没有自己写过文章了,今天写这么水的东西出来,求轻喷。。~~
kevin 11/29/2012

kevinjom

kevinjom

6 posts
16 tags
© 2016 kevinjom
Powered by Hexo
Theme - NexT.Muse